When you feel ambitious enough to run very demanding games on your PC, don’t you feel frustrated each time the game runs slowly? Unfortunately, it almost always happens during critical moments.
Say you’re just about to ‘Win a Match of Wick’s Bounty’ on Fortnite or, you’re breaking a combo in Injustice or even score a match-winning penalty on FIFA; it is so annoying when the game lags and prevents you from doing these things. I won’t blame you if you decide to pick your laptop up and smash it against the wall but seriously, don’t.
Did you know that you can convert your slow laptop to a powerful gaming machine? We’re going to show you how. We’ll start with the basics moving towards the advanced.
Table of Contents
Frames per Second (FPS)
If you’re new to the gaming world, you have probably heard the phrase FPS being thrown around frequently without knowing what it actually means. FPS can be explained in terms of the graphics card and the monitor. FPS is the number of images the graphics card will render within a second in terms of the graphics card. While for the monitor is how many frames it will display within the same time.
Frame rates run from 30, 60, 120, and up to 240. FPS works on the basic principle that the higher the better. Laptops with a higher FPS run games faster and more smoothly than those with a lower FPS. A frame rate of 30 is the least desirable while 60 is considered ideal; 120 is the ultimate while 240 is sometimes too fast for the human eye to follow. Increasing your laptop’s gaming performance entails increasing the frame rate. All we’ll be doing here contributes to increasing your laptop’s FPS.
Remove Background Files
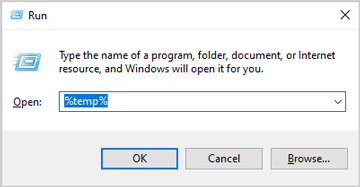
Some files that your laptop uses in the background are not particularly important to its functioning. However, they end up wasting space and can cause your games to slow down. Start by pressing the Windows and R buttons and type ‘%temp%’ (temp is short for temporary files), then OK.
Select all of them by pressing Ctrl+A, right-click, then select Delete All.
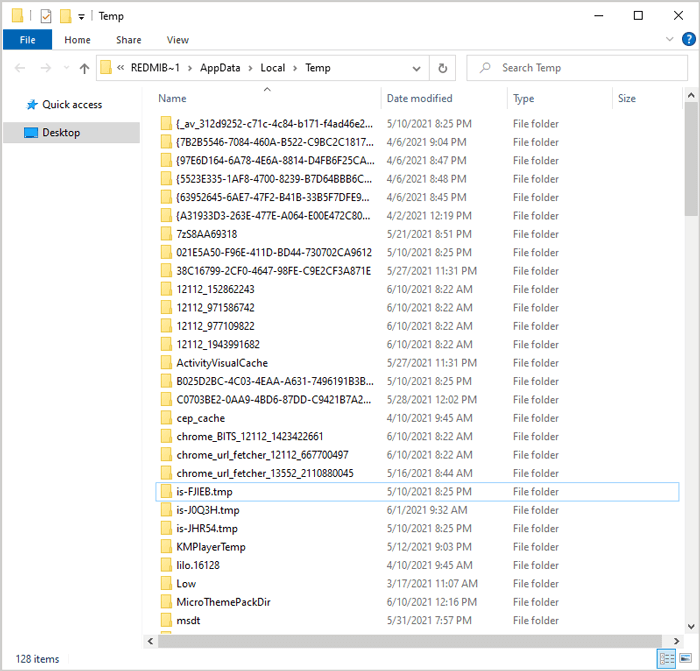
For any file that pops up on the screen as still being used, click on skip and wait for it to finish deleting. Right-click on the recycle bin and select empty recycle bin to permanently delete these files.
Set your Power Settings to High Performance
Here, you will allow your laptop to consume more power to run faster and smoother while boosting its FPS. Start by opening the Control panel.
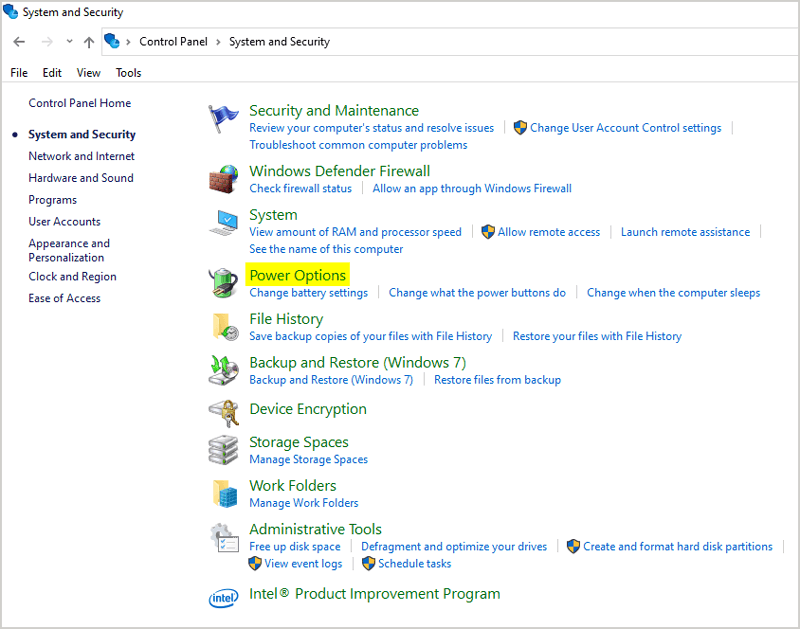
Press Windows+R and type control, and click OK. Next, click on System and Security, move down to Power Options, and click on it to open the window.
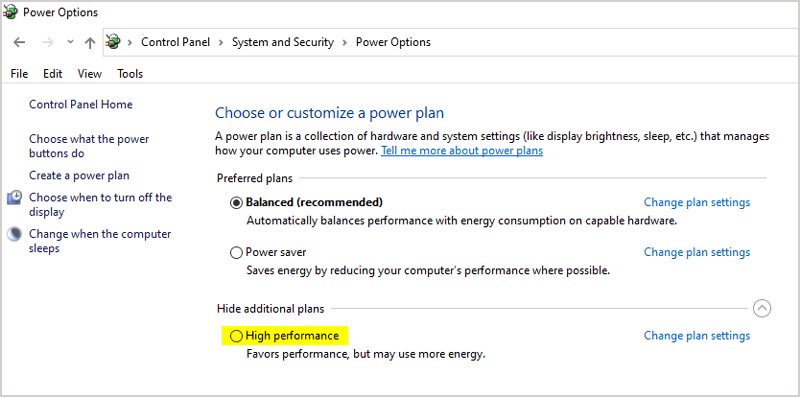
In the next window, click on the high-performance power option. Suppose you do not have this option; click on Create a power plan and select high performance; you can also name it this way.
Disable Notifications that you Do Not Need
Some notifications are sent to your laptop that you don’t need. For example, if you’ve been using Windows for a while, you do not need notifications about suggestions on how to use it.
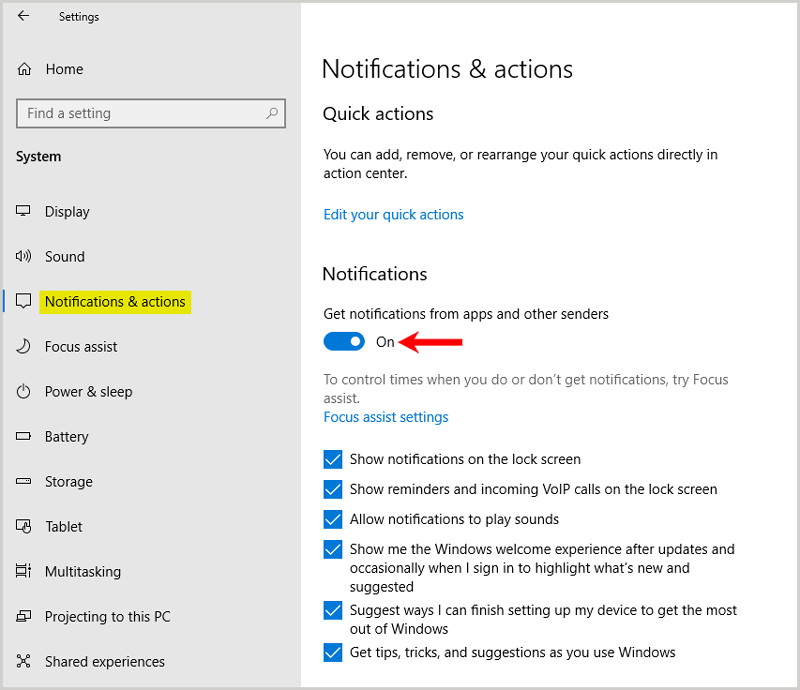
Open Settings via the taskbar’s search box and select System.
On your left, click on Notifications & Actions. Here uncheck all of these boxes; do not disable important notifications. These appear lower.
Disable some Startup Programs
Some programs have been set to run when you turn your laptop on automatically. I used to have a GIS software called Autodesk that started up when I powered my computer. Since it was heavy software, it used to slow down my games and sometimes they froze. As soon as I disabled it, my laptop ran my games faster. This can also work for you.
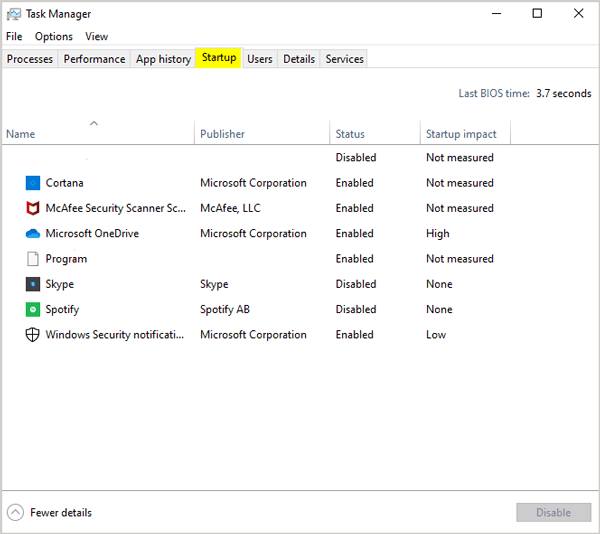
To find these programs, you need to open the Task Manager. Then, hold Ctrl+Alt+Delete and click on task manager. Click on the Startup tab; you will see a list of programs that automatically launch at startup. To prevent a program from doing this, just right-click on it and select Disable.
A good example is Skype and Spotify; these programs should only be launched when you need them and not during start-up. You should be careful about which programs you choose to disable from automatically launching during startup. For example, you could see a program like Realtek HD Audio, responsible for your laptop’s audio; this must be launched during start-up. Only disable programs for which you’re sure are not needed. On the bright side, you can always re-enable programs that you have already disabled.
Disk Cleanup
Increasing the storage on the disk drive containing your operating system is one of the ways you boost your laptop’s gaming and overall performance. This is also another way to get rid of temporary files. These files slow down your operating system since it will have to search through multiple files to get the required file.
The good news is, you can easily locate and get rid of these files. Instead of downloading external software, you can use Window’s inbuilt Disk cleanup. Give priority to the disk drive that contains your operating system before proceeding to clean up other drives.
Open the file explorer and click on This PC. Right-click on the disk drive that you want to clean up, select Properties, and click on Disk Cleanup. If you want more options, you can click on Clean up system files. Remember to go through these files, check the boxes you deem useless to your laptop and then click OK.

I do this regularly so that you can see no significant space occupied by these junk files on my laptop.
Suppose Windows Cleanup misses some junk files; there is an external cleaner software available for free that you can download, install, and use. The most common one is CCleaner. For more tips on how to increase your laptop’s storage for better performance, read our post on how to increase laptop storage.
Optimize your Disk Drives
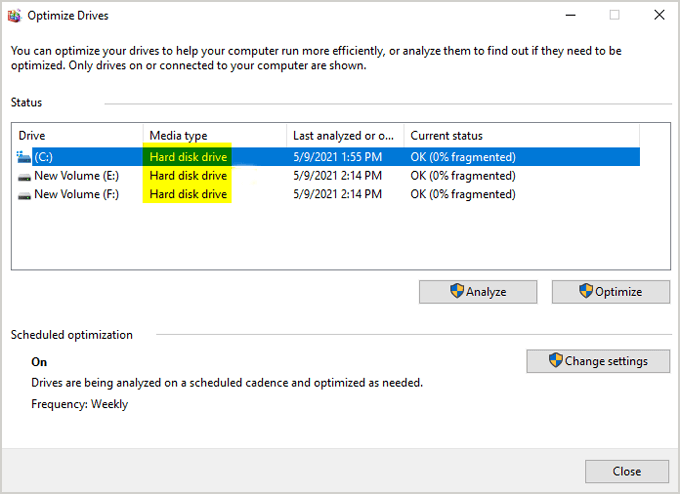
Here you will be attempting to ensure your hard disk drives (HDD) are running optimally. First, if your computer uses SSDs, optimize the HDD drives only. Then, while still under Local Disk C properties (Windows), click on the Tools tab.
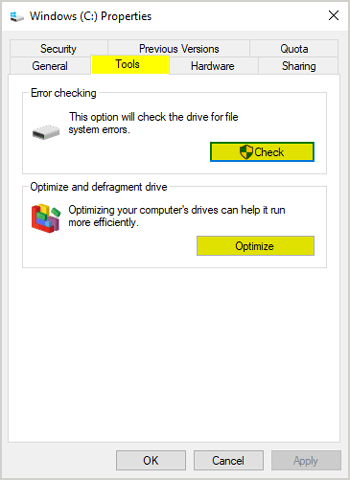
Before you optimize this disk drive, click on Check. Your laptop will check for errors in the drive and repair them. It takes longer for laptops with HDDs than for those with SSDs. Then click on optimize and only select the ones labeled ‘Hard Disk Drive’ for those using laptops with SSDs. I am using a laptop with an HDD, so I do not have the SSD options.
Optimization takes a lot of time, so make sure you do it when you don’t need to use your laptop urgently.
Adjust your PC for the Best Performance
If your PC specs are lower than the game you intend to run, you can milk every ounce of performance from it this way. Here you will be limiting your PC from doing things like animations in the taskbar, displaying shadows under windows, etc., and transferring these resources to be entirely used for gaming.
You should know that this will cause your PC to look more different than what you are used to. Press the Windows button and search advanced system settings and click on the suggestion that pops up. This should take you to the system properties window. Click on Settings under Performance.
You can also access this window by opening the control panel and clicking on System and Security. Then click on System and finally Advanced system settings on your right.
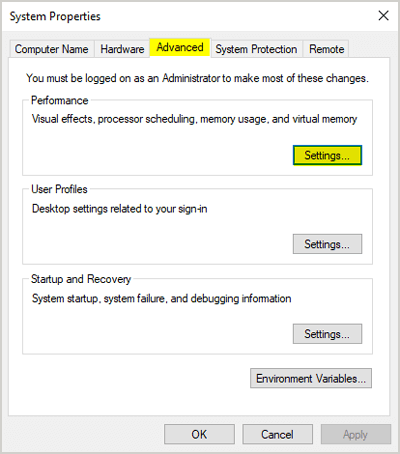
On this performance options window, click on Adjust for best performance, and you will notice that all boxes below have been unchecked. Click Apply to confirm. These are the unnecessary animations that you prevent your PC from diverting all the resources to gaming performance. The end result is that your games will run faster, smoother, and at a higher FPS.
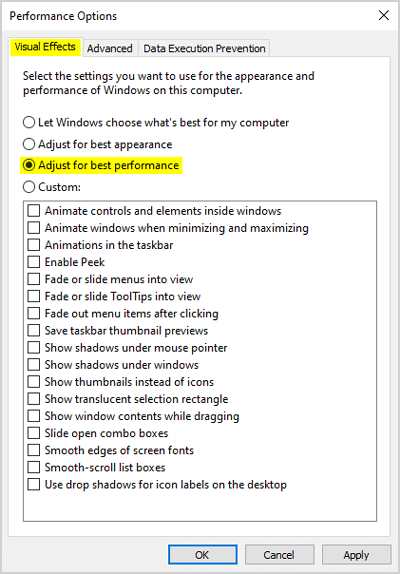
Suppose all of these changes are too drastic for you; click on custom and select the actions you still want your Windows to keep doing. If your computer is competent, just leave these settings at Let Windows choose what’s best for my computer.
Turn off Transparency Effects
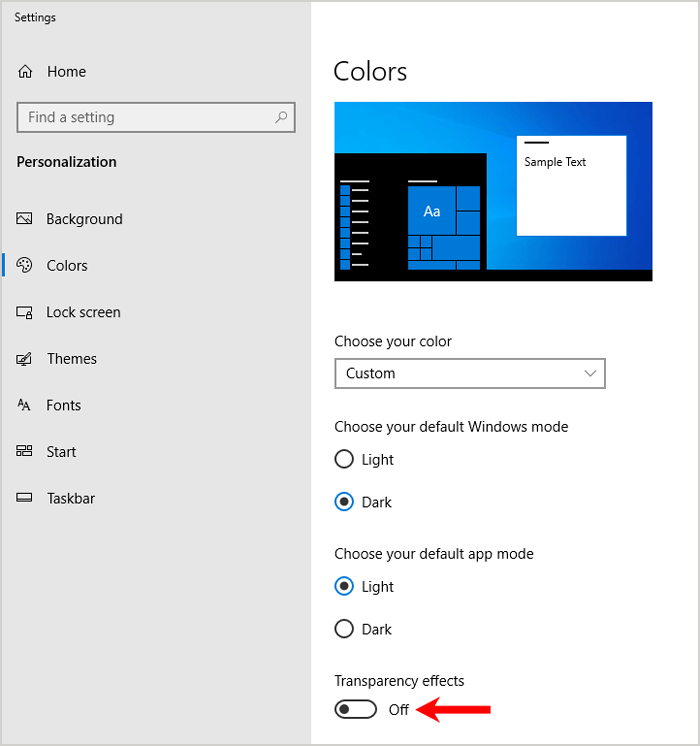
Still, in the effort to divert all resources to gaming, you can change your Windows theme to a solid color by disabling the transparency effects.
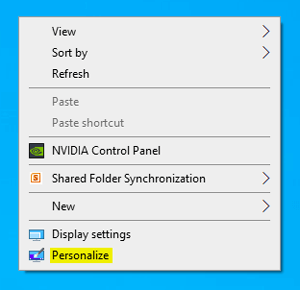
To do this, start by right-clicking on your desktop and then select Personalize.
Then click on Colors and turn the transparency effects off.
Optimize your Wi-Fi for Gaming
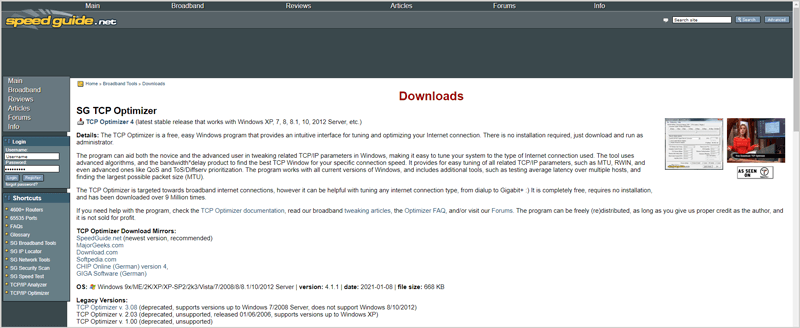
This part is entirely for online gamers. TCP Optimizer is an external software (available for free) that boosts Wi-Fi, increasing your internet speed, stops lag spikes, and increases your lowest speed.
Download TCP Optimizer from this link. It is less than 1Mb in size, so you shouldn’t have to wait that long. Instead, install it after it has finished downloading.
Use the slider to put in the maximum speed of your internet connection. Here I will show you with 80Mbps.
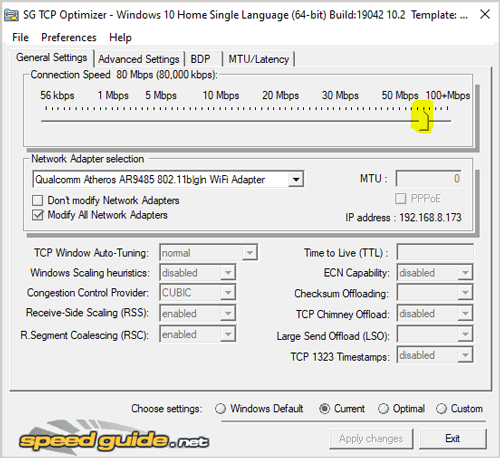
Click on File on the top left corner and scroll down to Import. There is a file that already has the best settings for this program. All you have to do is click here to download it.
When you click on Import, navigate to downloads and load this file. Once you input it, you should see changes in numbers on the TCP Optimizer window. After loading this file, click on Apply changes and then Exit.
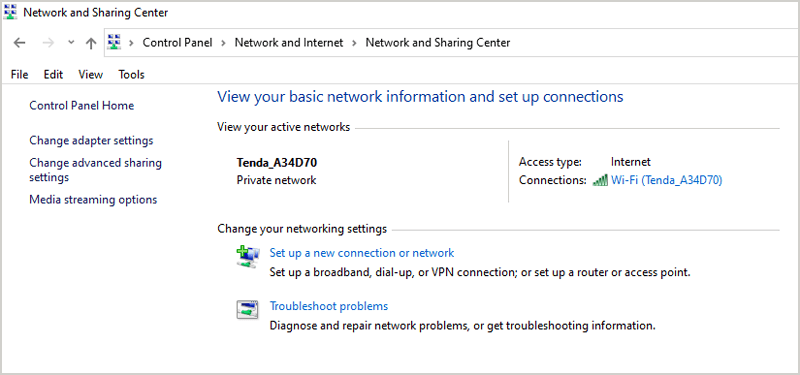
Open the Control panel and click on Network and Internet, then Network and sharing center, and finally click on your internet connection.
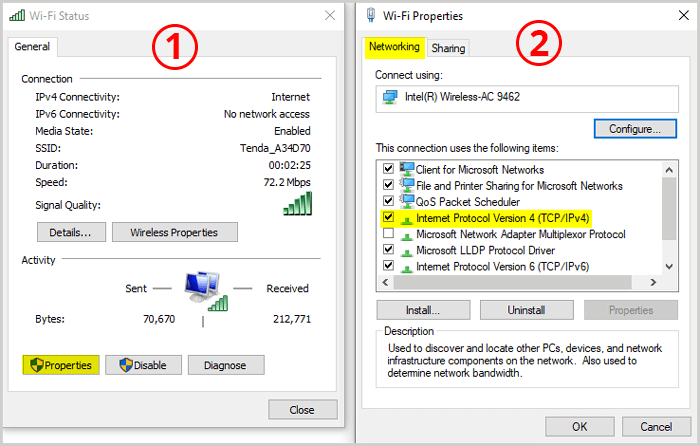
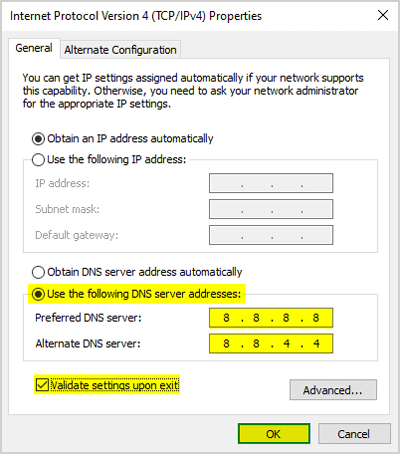
On your connection status window, click on properties and then Internet protocol version 4. What you’ll be doing here is choosing a DNS server that will reduce latency.
Click on Use the following DNS server addresses. On the first box, type 8.8.8.8 and on the second 8.8.4.4, check the box labeled Validate settings upon exit. Finish by clicking OK. This is Google’s DNS server.
Adjust Image Settings on Graphics Card
If you’re using an NVIDIA graphics card, you can slightly change your computer’s display to focus the graphics card’s resources on performance.
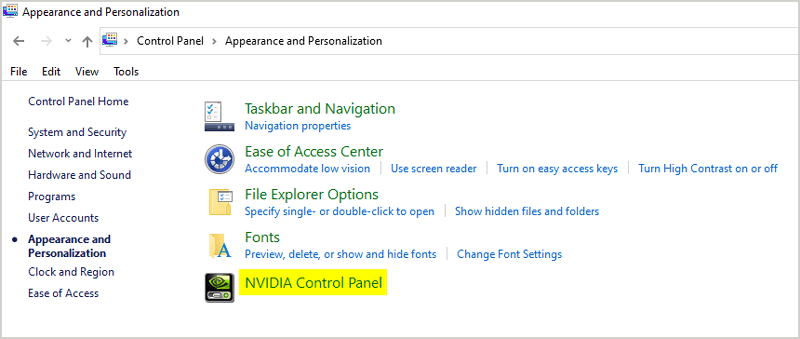
Open the NVIDIA control panel by first opening your PC’s control panel.
Click on Appearance and personalization, then click on the NVIDIA Control panel.
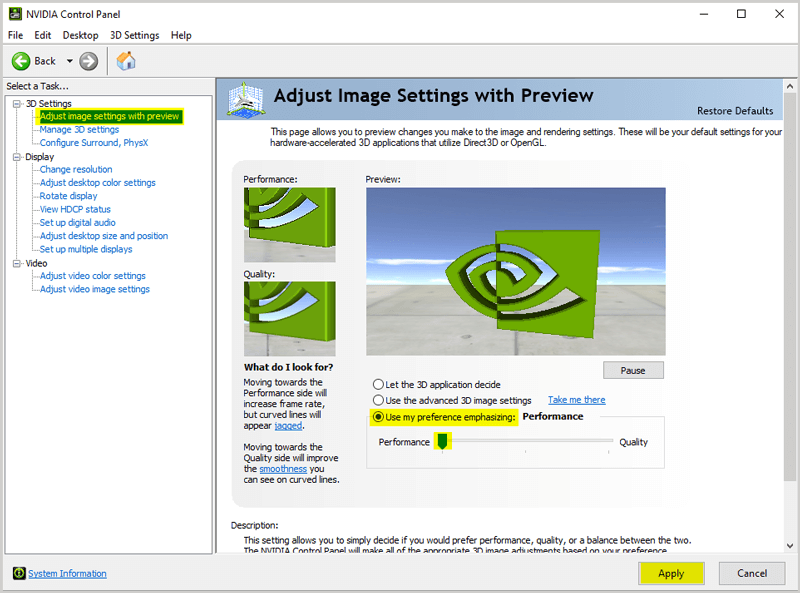
Select Use my preference emphasizing and then move the slider all the way to Performance. Finish by clicking on apply changes.
Add RAM to your Laptop
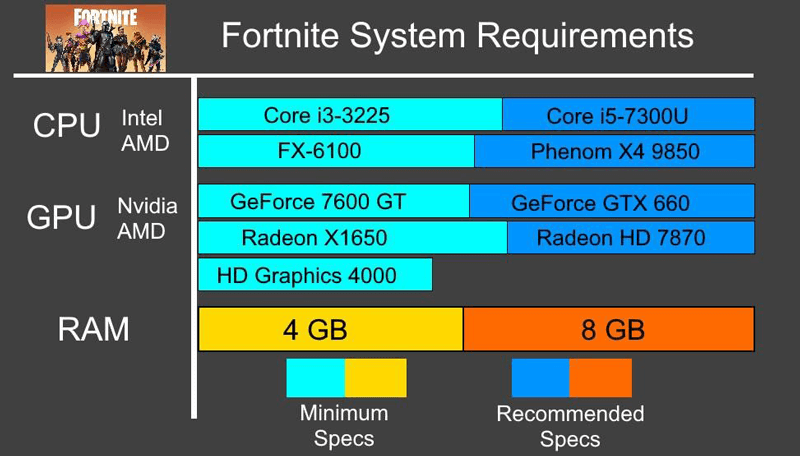
If your PC has a lower RAM than the one recommended for running a particular game, increasing the RAM will increase your laptop’s gaming performance. Suppose your PC is competent enough and has enough RAM to run these games; adding RAM will not significantly impact the FPS. In this case, you would want to add RAM if you intend to run this game alongside other processes.
If you want to know how much RAM you need to run a game, look up the specific version online and check for requirements; manufacturers always indicate these things. Here’s an example for Fortnite.
Adding RAM to your laptop involves you opening it up and manually installing it. If you’re competent enough, follow these steps; but if you’re not, get in touch with a professional and let them install it for you.
Disable all Background Apps
Applications such as calendar, camera, clock, etc., are always running in the background. You can disable them and ensure your laptop is solely focusing on gaming.
I would advise you to turn them back on after you’re done gaming because you might actually miss your appointment with the dentist.
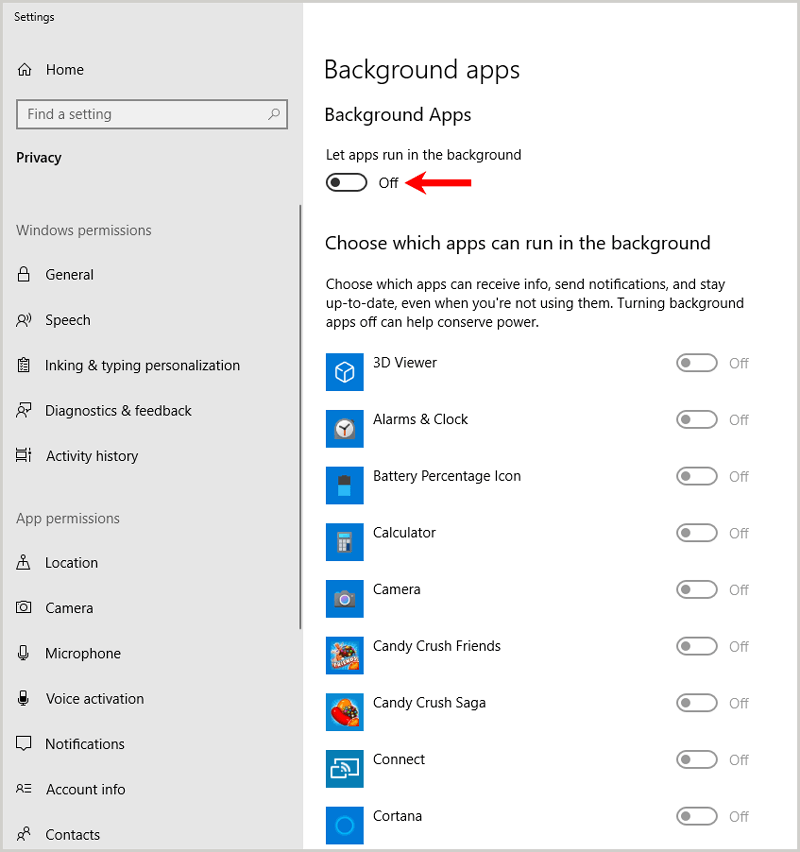
To disable these apps click on the start button and search background apps. Click on the first suggestion and select Off under Let apps run in the background.
Overclock your Laptops GPU
Overclocking entails increasing your laptop’s performance speed beyond what the manufacturer intended and then allowing it to consume more power to support this change. You can overclock both your laptop’s CPU and GPU. If you’re using a laptop with Intel processors, use Intel® Extreme Tuning Utility (Intel® XTU) to overclock it.
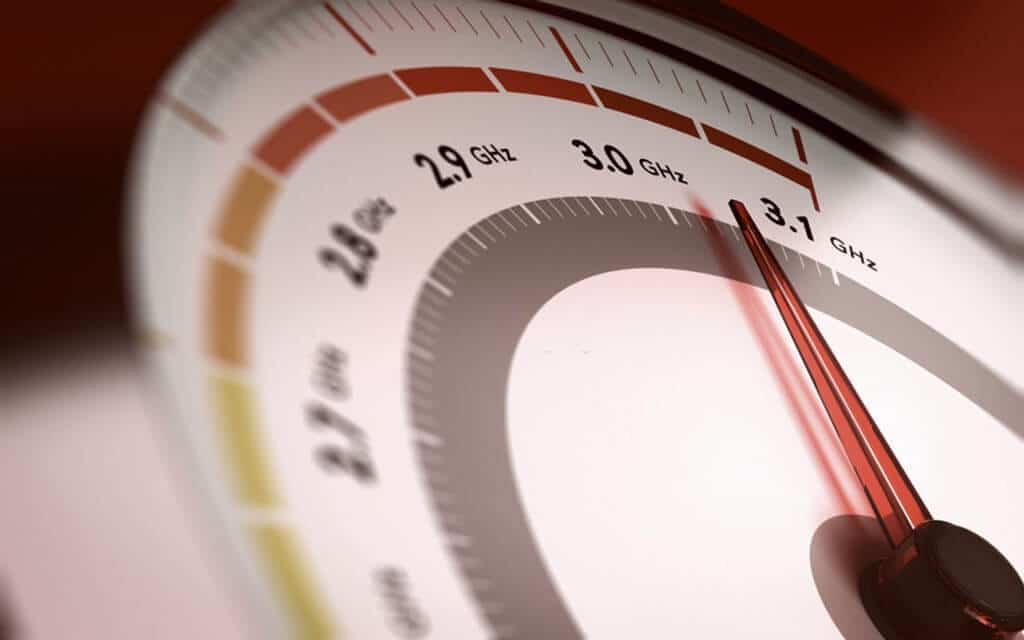
You can overclock your laptop’s GPU if it uses AMD Ryzen processors with a Radeon graphics card. However, I must warn you that overclocking was initially made for desktops because you can actually purchase the hardware to support this process. Therefore, you must know your laptop’s limits before attempting this. If you would like to know how to do this, read our guide on How to Overclock a Laptop.
For the best gaming experience, you must ensure that your laptop is optimized to do so, especially when it is not competent enough. All of the processes highlighted here are not risky since they can be reversed, except overclocking. We would like to know if you enjoyed reading this and if it was helpful to you. So, please leave a comment below to inform us if that was the case.

Be the first to comment